Wednesday, October 29, 2008

I Made Some Halloween Stuff (on the cheap)

I haven't updated for a while because I've been moving into a new house, but now that we're moved in and I've got some free time with Halloween coming up I decided it was time to make some decorations. I've got more details over on Instructables. A giant spider web, spooky fence, grave stones, and a dead guy made of expanding foam await you here if you dare. The whole thing was done on a shoestring budget since I'm not one to break the bank for something that'll be up under a week. Enjoy, and Happy Halloween!

Thursday, October 23, 2008

I Made a Skeleton With a Scandanavian Accent


With Halloween coming up and my roommates and I hosting our first ever party, we were looking to do some decorations. I got one of those plastic skeletons in a box, but he was pretty generic other than a rather happy look on his face. Is it a face? I'm not sure. His mandible looks happy at least. Anyway, this reminded us of the key holding skeletons from The Legend of Neil. The other day Bri (roommate and Daniel's girlfriend) got a rather large metal key, with no specific purpose for it in mind. As we had the skeleton though and it seemed to remind us of the show, we remembered the key and decided that he must have been a snarky, murderous, and Scandinavian skeleton who was "gay for deals".

Anywhichwhats, It's a plastic skeleton, a piece of shirt sleeve nailed on as a mustache, a wooden sword taped to his hand, and a hook holding the key in place with a cardboard word bubble. We're debating whether he's a halloween fixture or more permanent.

Saturday, October 4, 2008

I Made My Niece and Nephews Have Fun, and Make Things


I feel it's my duty to pass the spark of taking things apart, hoarding random interesting bits of things, and fixing things that others would simply toss to the next generation. Since I don't have kids of my own yet to pass this trait onto I practice on my brother's kids and their friends. To their friends I'm usually introduced to their friends as "uncle Ronnie, the one I told you makes all those weird things". I'm not sure how many kids I'm not the uncle of I'm uncle Ronnie to. It's kinda cool.

Anyway, on the way to work today I picked up a Razor electric kids chopper from someone's trash. The speed controller and batteries were long gone, but those are always the first things to die in these cheapie kids' rides and the drive train was still there. When the yung-uns came over this afternoon and saw this they wanted to know immediately if I could make it work and if we could do so before they left. It was already kinda late, but when my youngest niece came in and asked I couldn't say no. So I set them all to work helping to get it functional. My nephew holding wires and helping solder, his friend grabbing, stripping, and cutting wires, and my little niece testing that the beefy power switch made it go once it was all together. I used a couple mismatched, but fairly equal capacity batteries I had around for power, and we were ready to go. This was all frantic as it was already past dark and they were worried they'd be headed home at any moment.

We aired up the front tire with my air compressor, grabbed a flashlight for a headlight, and they rode it up and down the dirt road a few times on whatever power the batteries had. They had fun and I also got the chance to teach them about basic electronics, soldering (using my 40 year old 200w soldering iron), the precautions to be taken with big batteries (after shorting together the batteries in loop), and they were really having a good time trying to beat the clock and bring the little chopper to life. It's a squirrly little ride that ought to be on paved cul-de-sac rather than dusty dirt road, but it's fun none the less and I think they had more fun getting it running than from actually running it. We'll see if that changes when I get the batteries to full charge.

I Made an Air Compressor Work Nicely

I picked up an old air compressor that had seen better days from my brother a couple days ago. He'd gotten a larger permanent setup going and didn't need his old beat up compressor so I get the hand-me-down. Cool :)

When I asked what was wrong with it the list was along the lines of "something with the wires, it has a leak, and the gauge is broken." The pressure switch was also MIA, the belt has seen better days, and the whole thing looked rough as a pine cone. Time for a tear-down and cleaning.

I started by running it to figure out the problems since it did run if very poorly. The wiring was a lamp cord wrapped around the motor's terminals, the leak was from the compressor's leaf valve and from the copper feed to the tank, and the guage worked but was way off and sticks on 20PSI.

I took the head off the compressor, revealing a sludge in the piston chamber, as well as all over the two reed valves. Cleaned those up well with degreaser and a razor blade on the reeds, put it back together and it didn't leak there (and added about 10cc per cycle due pumped to no
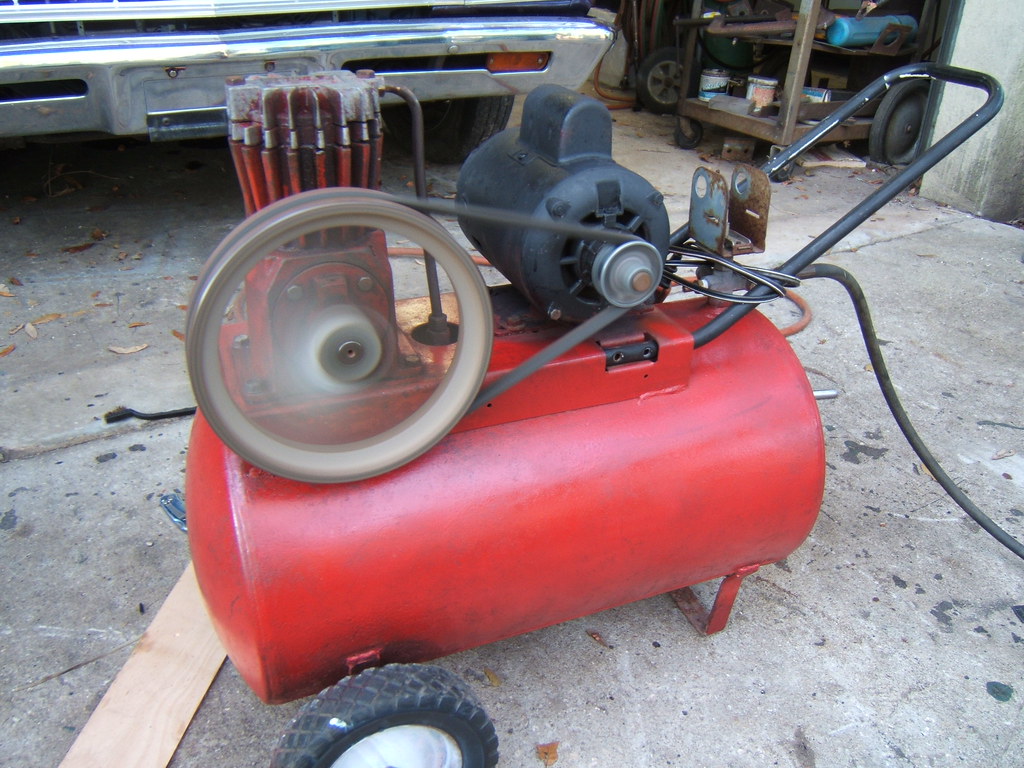
t being full of sludge. I tried sealing the bad feed to the tank, but had to cut it shorter and put a new faring on the line, which solved that problem. I trimmed the frayed strands from the belt, oiled the motor, and attached the wires with proper connectors. With this done, I decided to check the crank case oil. This was a scary sight, as there was enough water in the oil to turn it a milky grey, and it was so old when I drained it most of it slowly plopped out for several minutes like grey snot. New oil in the case and it sounded happier while running. For now I'm testing pressure with a shrader valve and tire guage, unplugging the compressor around 100psi. After tightening the wobbly wheel up, I wire brushed the whole thing and painted it up. I also added a handle to make it easire to handle from my small blue pressure tank.

That "ka-pook-ka-pook-ka-pook-ka-pook" of an air compressor is a nice sound. Especially when it comes from something that was otherwise destined for the landfill. I know it might look a little rough now but by comparison to when I got it it looks great and runs fantastic. I expect this little thing will keep me in inflated tires and filled potato guns for as long as I like.

I Made a Really Big D20


While showing a friend of mine some of the things I've made recently he asked me if I could make a big D20 (a 20 sided die used in some tabletop RPG games). We tossed around a few ideas for it and it sounded pretty ambitious since I didn't know the angles I'd need. I got a couple pieces of poplar 1x6, cut them into 20 equilateral triangles, put did some test cuts with a table saw until I got the right angle to put on the inside edge, and then had all the pieces done.

To attach them together used masking tape to put together 3 sections, the top, bottom, and middle belt, and used wood glue to hold it together. While the glue was still wet I put the three sections together, then balanced a weight on top to press the pieces together for a tighter seam.

The numbers were printed out, cut and taped in place. Then I used a square tip screwdriver to punch them into the wood and painted each number with model paint. After three coats of wood stain it was all done. You can see photos of the build on this Flickr set.